

Blog
How to Assemble a Divan Bed: A Practical Step-by-Step Guide


A divan bed usually arrives looking more complete than a flat-pack frame. The upholstered base has already been built; your job is to fit the feet, join the sections and attach any headboard or storage fittings. This guide shows you how to assemble a divan bed — and how to put a divan bed together — in a clear, practical order.
The process is straightforward once you identify the connectors supplied with your particular model. Do not begin by copying a generic diagram, though. U-clips, linking bars and hidden connectors all work differently, so keep the manufacturer’s instructions nearby. Read those instructions before opening sealed hardware packs or removing transit straps.
Identify the parts before moving the base
Open the fittings pack and compare its contents with the parts list. The bag may be fixed underneath one of the base sections or placed inside a drawer.
Depending on the model, you may have:
- Castors, plastic glides or screw-in wooden legs
- U-shaped joining clips
- Metal linking bars with bolts
- Headboard bolts, washers and spacers
- Drawer handles and screws
- An Allen key or another model-specific tool
Do not worry if your pack does not contain every item above. A single divan may have no joining hardware, while some two-part bases use hidden connectors that are already attached.
You will commonly need a screwdriver, scissors, pliers and a rubber mallet. Avoid using a metal hammer on castors or plastic glides because it can split or distort them.
An adjustable spanner can help with linking bars, and a protective sheet or flattened cardboard will keep the upholstery and floor clean. On wooden, laminate or tiled flooring, place suitable cups beneath the castors to protect the surface and reduce unwanted movement. A power drill is rarely necessary and can damage a fitting if it is overtightened.
Unpack the divan carefully
Place each section on a clean sheet or flattened cardboard to protect both the upholstery and the floor. Remove the outer wrapping without running a knife deeply along the fabric.
Keep the packaging until you have checked the bed for damage and confirmed that all parts are present. Collect loose staples and move plastic wrapping away from children and pets.
Drawer divans may have fabric strips, clips or staples holding the drawers closed during delivery. Do not remove these until the base is in position. If you have an ottoman divan, do not cut any retaining strap until you have read the safety instructions for the lifting mechanism, or our ottoman bed assembly guide.
Work out the bed’s position first
Move both base sections into the bedroom before fitting them together. Trying to steer a completed double or king-size divan through a doorway is harder and can damage the upholstery.
Decide where the head of the bed will sit. Check the position of:
- Headboard fixing labels
- Side or end-opening drawers
- Nearby radiators and plug sockets
- Wardrobe doors and bedside furniture
If the sections have both square and rounded corners, the square edges normally form the central joint. The rounded corners face outwards. Labels and the supplied diagram should confirm the correct orientation.
Identify the head and foot ends

Look for headboard bolt holes, labels or marked attachment points. These show which end of the base is designed to take the headboard.
Next, check the drawer arrangement. On a two-drawer divan, both drawers may need to face the same side. A four-drawer base normally has storage on both sides. Getting the orientation right now saves you from separating and turning the bed later.
Divan sections are bulky and can be difficult to grip. The principles in the HSE’s manual-handling guidance are useful here: consider the load, your posture, the route and your own ability before lifting. Clear the floor and use two adults for a two-part or storage base.
1. Fit the castors, glides or legs
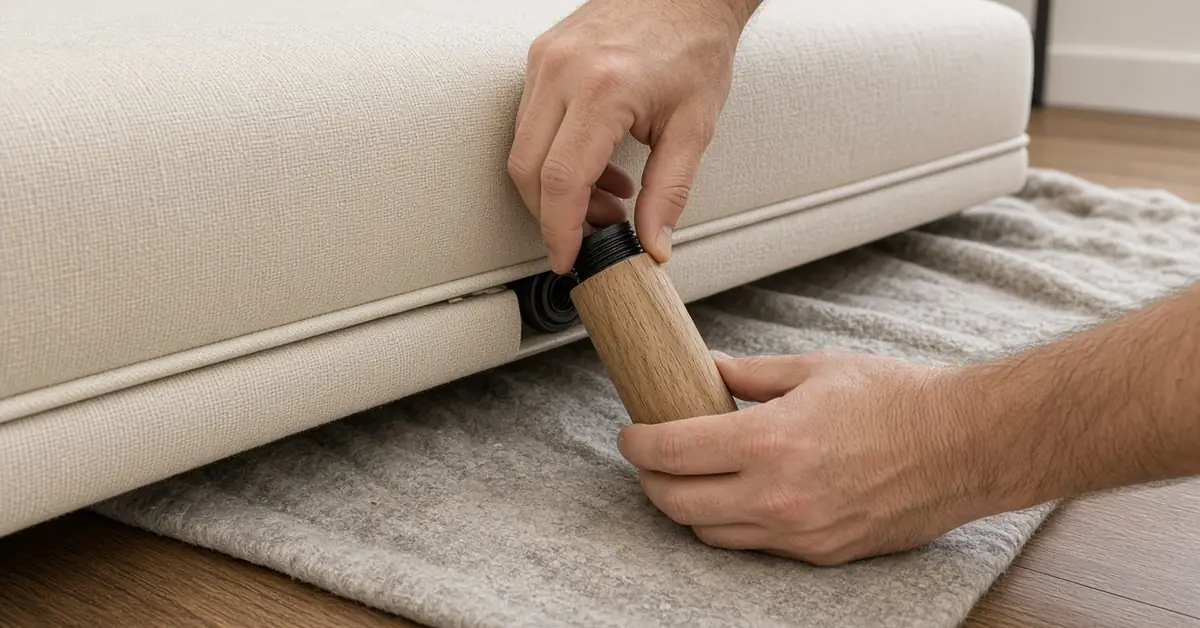
Place a clean blanket or flattened cardboard on the floor to protect the fabric. With help, turn each section upside down or onto the side specified in the instructions.
Locate the prepared fixing points underneath the base. Then fit the supplied supports:
- Push-in castors or glides should enter their sockets squarely. Use a light tap from a rubber mallet if needed.
- Screw-in legs should be turned by hand until secure. Do not overtighten them.
- Braked castors, if supplied, are usually most useful on the accessible outer corners.
Check that every support has reached the same depth. One partially fitted castor is enough to make the finished bed rock. If a screw-in leg feels tight or sits at an angle, remove it and start again; forcing it can cross-thread the fitting. Make sure you have found every fitting point, including any positions near the centre of the bed.
With one person at each end, return the sections to an upright position. Do not drop them onto their new feet.
2. Bring the base sections together
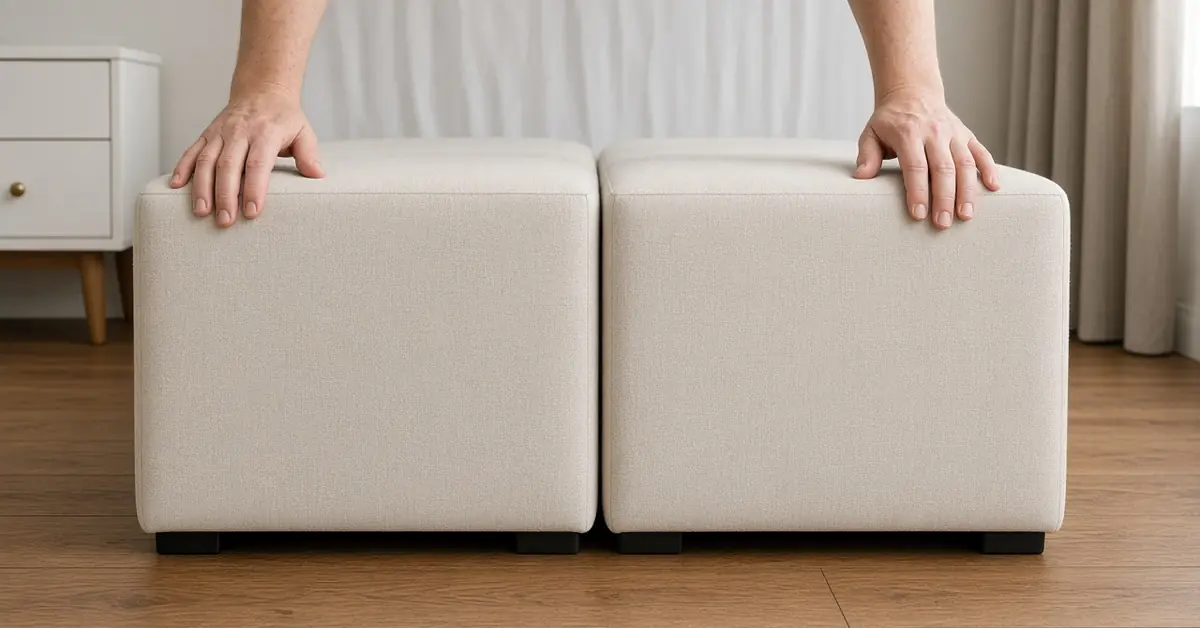
Move the two halves into their final arrangement and push the flat joining faces together. The top edges should be level, with no twist or step at the seam.
If the floor is uneven, deal with that before installing the connectors. Joining misaligned sections under tension can lead to movement, noise or unnecessary strain on the fittings.
3. Secure the correct type of connector
U-clips
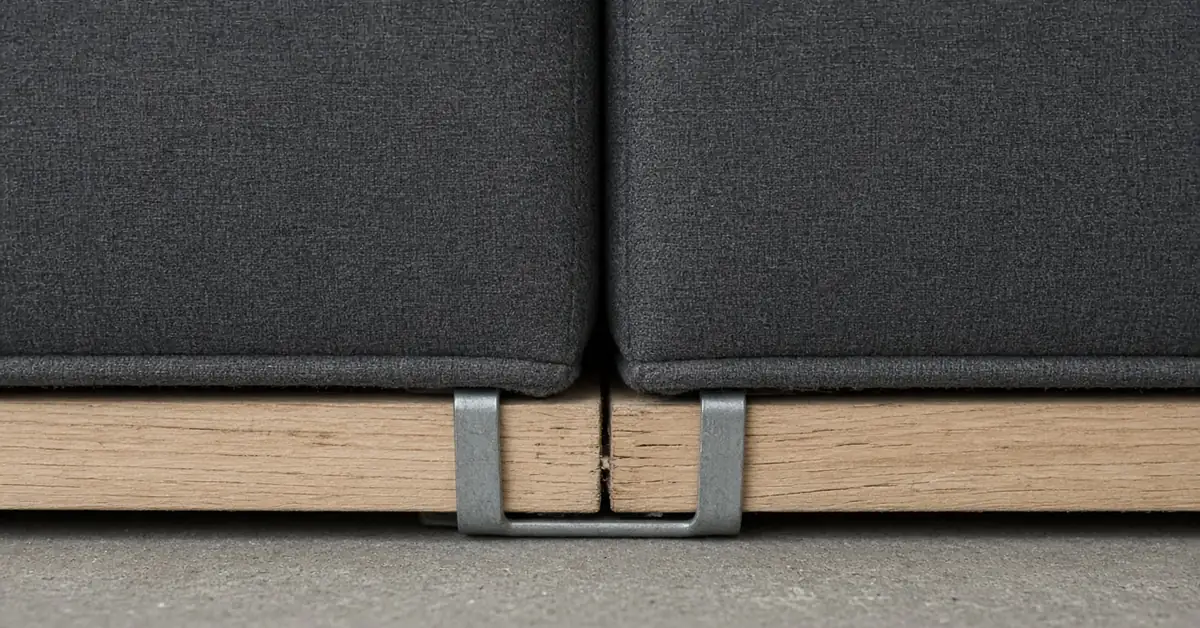
U-clips clamp the adjoining timber rails together. The bases usually need to be placed on their sides so you can reach the underside safely.
Bring the rails into close contact and press each clip over both rails at the locations shown in the instructions. Keep upholstery and fingers clear of the clip. Do not hammer it against an unsupported fabric edge.
Linking bars
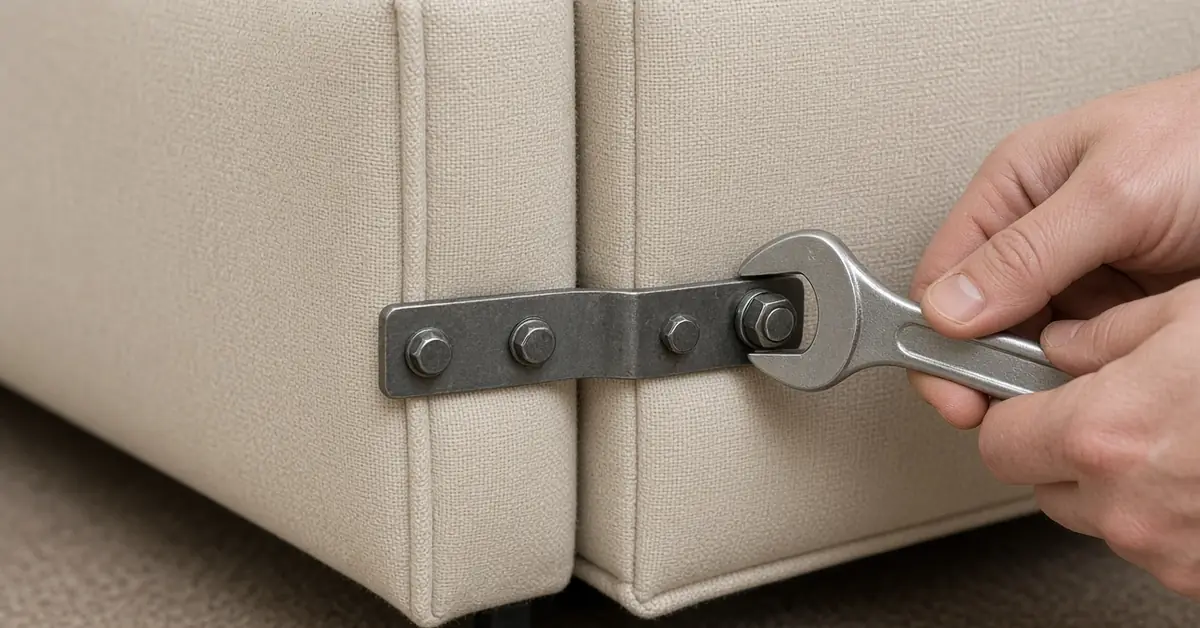
Link bars normally attach to threaded holes near the central seam on both sides of the bed.
Start the bolts by hand and leave them slightly loose. Position the bar across the joint, check that the two halves remain flush, and then tighten each side evenly. Starting every bolt before fully tightening one makes alignment much easier.
Hidden or interlocking connectors
Some divans arrive with metal plates already mounted. These may slide, hook or drop into one another. Align the two sections carefully and use only the movement shown in the manufacturer’s diagram. Forcing an unfamiliar connector can bend it or tear the surrounding fabric.
Once connected, push gently against each section. They should move as one base rather than separating at the middle.
4. Release and test the drawers

Transit straps stop storage drawers from opening during delivery. Leave them in place while the base is being turned.
Once the bed is upright and connected, pull each drawer out slightly and locate the retaining fabric. Cut the strap carefully without cutting the upholstery. Remove loose staples with pliers rather than leaving sharp metal underneath the bed.
Fit the handles, then open and close every drawer. A drawer that rubs may indicate that the base sections are not level or that a strap has not been removed completely.
5. Attach the headboard

Find the marked headboard fixing points at the head end. Threaded inserts may sit beneath the covering fabric, so feel for their centres rather than making an unplanned hole.
Attach the headboard struts to the headboard if they are separate. Screw the headboard bolts into the base, leaving enough room for the slotted struts and any supplied spacers. Slide the struts into position, set the headboard at the required height and tighten both sides evenly.
After placing the mattress on the base, make the final height adjustment. The headboard should sit neatly above the mattress without rocking or pressing awkwardly against the skirting board. Floor-standing headboards rest on the floor behind the divan and use a different fitting arrangement, so follow their dedicated instructions.
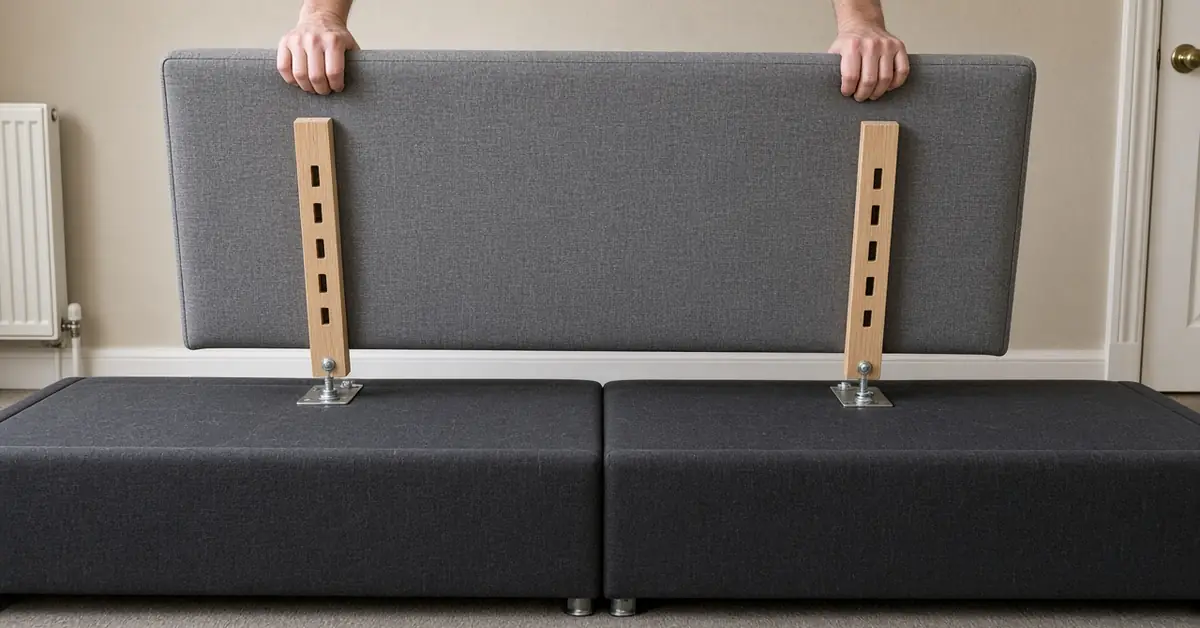
The headboard should feel stable, but excessive force can damage the threads or compress the timber inside the base. Never move the assembled bed by pulling on the headboard.
Take extra care with an ottoman divan
An ottoman base contains a lifting mechanism under tension. The lid may rise suddenly when a transport strap is removed, and some designs should not be operated without the mattress in place because the mattress weight helps control the lift. Do not remove transit restraints, attach gas struts or force the platform open unless the instructions specifically tell you to do so.
Use two adults, keep hands, children and pets away from hinge points, and follow the dedicated guide to assembling an ottoman bed rather than treating the base as a standard divan. If the platform rises unevenly or a fixing does not align, stop and recheck the assembly rather than forcing it.
Check the completed bed
Before adding bedding, confirm that:
- All feet sit firmly on the floor
- The central joint is closed and level
- Connectors and headboard bolts are secure
- Drawers have enough room to open
- No packaging, loose staples or tools remain underneath
- The mattress is centred and properly supported
Move the base into its final position before adding the mattress. Lift or roll it with help rather than dragging fixed legs across the floor. Once the mattress is in place, sit gently on different edges and listen for movement or loose fittings.
Recheck accessible fixings after the first few nights. A small amount of movement can reveal a bolt that needs tightening.
If you are choosing a new base, compare the Alornoth divan bed and the Kadrera horizontal-channel divan bed, or, for a bed that can be split into two singles, the Auranvane zip and link divan set.
Conclusion
A divan bed does not need extensive construction, but the order matters. Establish the orientation first, fit every support fully, align the sections without tension and use the connector designed for the base. Storage and headboard fittings should come afterwards.
Keep the assembly sheet and spare fittings in a labelled bag, and take a photograph of the completed connectors before fitting the mattress. That simple record will make a future house move or room rearrangement far less confusing. If you move house or redecorate later, separate the base at its proper connectors rather than forcing the complete bed through a doorway.
Frequently asked questions
Can one person assemble a divan bed?
A single base may be manageable alone, but two adults should handle two-part, drawer or ottoman divans. Putting a two-part divan bed together is safer with help because the sections are bulky and awkward to turn.
How long does divan bed assembly take?
A standard pre-built divan base commonly takes around 20 to 40 minutes. Ottoman mechanisms and large headboards may take longer.
How are two divan halves joined together?
Most use U-clips, linking bars or pre-fitted interlocking plates. Use only the fittings and method specified for your model.
Should I fit the headboard before the mattress?
It is usually easier to install the headboard first, then place the mattress and make the final height adjustment.
Why is my divan bed wobbling?
Check for a castor or leg that is not fully inserted, an uneven floor, loose linking hardware or base sections that were joined out of alignment.
Do all divan beds come in two halves?
No. Single divans often arrive as one base. Small double, double, king and super king models commonly arrive in two sections, although the design varies.
Should I fit the headboard before joining the bases?
Usually, the base sections and feet should be assembled first. Attach the headboard once the complete base is upright and correctly positioned, then place the mattress and make the final height adjustment.
Why is there a gap between the divan sections?
Check that the joining edges are aligned, the connectors are fully engaged and all feet are fitted to the same depth. Contact the retailer if the gap remains or the base appears damaged.